You’ve made the smart choice to include a drainage system in your two-story deck build. Now, how can you create a beautiful, finished room, or patio?
The first step may be adding a do-it-yourself ceiling beneath the deck. This great DIY project has many advantages.
Why You Should Install an Under-Deck Ceiling
Some homeowners just want to cover up the exposed under-deck beams and boards when they choose to add an underdeck ceiling. But if you’ve properly installed a deck drainage system, there are so many other advantages. With an under-deck ceiling you can create:
- An outdoor kitchen. Whether you add just a portable cart or a full kitchen to your patio, you’ll be able to eat outside without worrying about the forecast. Add some screening, and you won’t even have to worry about the bugs.
- A private retreat. Add a hammock or bed-sized swing. Install speakers for your favorite music. Buy or create a fountain that’s always running and thoughtfully place some greenery or blooming plants to make it feel more like a vacation spot.
- An entertainment center and a wet bar. You’ll instantly expand your party space by finishing the area beneath your two-story deck. Be sure to buy a waterproof television approved for outdoor use.
- A spa. Nothing beats a hot tub in the quiet, private space beneath your two-story deck. Make it your weekend oasis.
- A personal workshop. Whether you’re breaking out the circular saw, carving wood, or repairing small engines, you’ll love the added space beneath your deck.
- A game room. Add a poker table, a cabinet full of board games, or make it a play place for the kids. The family will have hours of endless fun in this outdoor space that’s protected from the elements.
- A storage room. You might choose to completely enclose your two-story deck, making it the perfect place to store everything from seasonal decorations to out-of-season lawn and garden gear.
Whatever your fun or functional plans for your new outdoor living space, you’ll enjoy these benefits with an under-deck ceiling:
- Make your backyard and home more attractive
- Increase your home value, with more dry, useable space
- Eliminate the rafter space where wasps and spiders love to breed
- Fight mold growth and make it easier to clean
How to Install an Under-Deck Ceiling
Before setting up an under-deck ceiling, you must ensure the space above it — the space between the deck boards and the ceiling is watertight. Some DIY websites recommend adding a deck roof to an existing two-story deck. This roof under the deck allows water to drip through the deck boards, over the wooden joists and beams, and get the wood wet repeatedly. Wet wood will eventually rot, especially in more humid climates.
And it doesn’t take long. In just 8-10 years, your wooden substructure can be significantly damaged by moisture. See for yourself in this video.
Additionally, if there’s any moisture trapped between your deck boards and the roof or ceiling you installed, then adding electrical wiring for ceiling fans, light fixtures, or utilities becomes quite dangerous. Not being able to add electricity will significantly impact how you use your outdoor living space.
With Trex RainEscape, you create a gutter and downspout system that will waterproof your substructure — the joists and beams that support your decking — and the area under your deck, creating dry useable space. The reason Trex RainEscape is so effective is that it is an over joist system, meaning it creates a barrier for water that prevents rain from even touching your wooden substructure. If you’re building the deck yourself, choose an over-the-joist system like Trex RainEscape that offers easy installation.
Tools and Materials Needed for the Job
For most under-deck ceilings, you’ll need a few tools:
- Circular saw
- Cordless drill
- Drill bit set
- Safety glasses
- Stepladder
For the actual ceiling, you might opt for a pre-made under deck system— which you’ll still need to cut to size — or start with large ceiling panels.
Guide to the Ceiling Installation
Step-by-step instructions for the ceiling will depend on what kind of ceiling you are installing, the materials used, and whether you choose to use a ceiling system or start from scratch with your build.
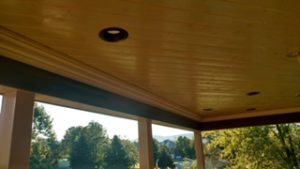
There are many different material options to choose from when designing an under-deck ceiling, commonly referred to as a soffit. Soffits are available in a variety of materials. Homeowners often choose an aluminum or vinyl soffit because they are less costly and easy to install.
The benefits of aluminium include:
- Superior durability that will not rot, chip, crack or rust
- No repainting required
- Highest ventilation efficiency of any product
- Easy to clean and maintain
- Highly flexible and less rigid than vinyl
- Water and fire-resistant
The benefits of vinyl are:
- Very low maintenance
- Resistant to insects
- Less expensive than most other options
- Very versatile – lots of choices in colors and textures
- Highly durable – will not rot or corrode over time
- Water repellant
- Can withstand most weather conditions
Your preferences for color and texture will also help inform the ceiling finish you choose. Some homeowners prefer a beadboard look and feel while others want a more smooth ceiling.
No matter which options you choose, the addition of a ceiling is a simple home improvement with lasting benefits. Start enjoying the outdoor life even more with your new under-deck living space!