How to DIY an Under-Deck Drainage System
By Dave KileIf you’re adding a second-story deck to your home, there’s one element that will add lasting value to your outdoor living space: an under-deck drainage system.
The great news is it’s an easy add-on for any deck builder — do-it-yourself or pro. Check out this video for step-by-step directions.
Why Add a Drainage System?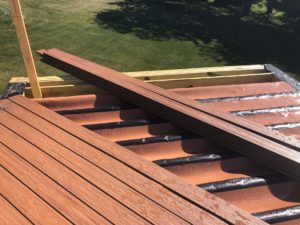
With a drainage system in place, you can add a ceiling system/deck roof and not have to worry about waterproofing. The under-deck drainage system does all of the work, drawing away water from your decking — Trex composite boards or any decking —leaving you with dry space and so many wonderful possibilities.
You have permission to dream. Want to add a play place for the kids? How about an entertainment area for friends and neighbors? Perhaps a private spa and hot tub? Or a storage space for seasonal decorations or sports equipment? An under-deck drainage system makes it all possible just by using the unused space under your two-story deck.
Types of Drainage Systems
When it comes to deck drainage systems, there are essentially two choices: over-joist or under-joist. An over-joist system is just that: a drainage system installed over the joists, so water never comes in contact with the joists. An under-joist system allows water to trickle through the slats in your decking, run over the joists, and collect in the drainage system beneath.
Below-joist drainage systems cause damage and wood rot in three ways:
- First, they allow the wood to get wet repeatedly as rain drips through the deck boards, over the joists, and into the drainage system below. The water hits the pan and runs out, but not before drenching the joists.
- Second, this type of system can trap moisture. There’s no air coming in to dry out the wood if installing a ceiling beneath the deck. The only ventilation is through the quarter-inch or less spaces between the top boards.
- Third, in the hot summer months, the temperature further cooks this trapped, wet wood and accelerates the rotting. Over time, this is the perfect formula for wood rot: moisture + heat – ventilation = destruction.
See what happens to wood with under-joist drainage systems in this video.
 The best deck drainage systems are above the joists. This type of system provides 100% protection of all the joists and beams from moisture penetration. This type of system also helps to hold the screws in place longer.
For the DIY builder, be sure to choose an over-the-joist system that’s easy to install. Then, use this handy chart for comparison. As you’ll see, Trex RainEscape offers high-quality and easy installation.
Add extra protection, especially in high humidity areas, add ventilation to your under-deck ceiling with strip vents. These vents release hot air and help mitigate temperature extremes.
One more low-cost idea for preventing water damage: use flashing tape over the joists and beams. Trex Protect’s butyl tape covers the top of the joist, rim joist, and ledger board and helps prevent rot and wood decay.
Tools Needed for Installing a Deck Drainage System
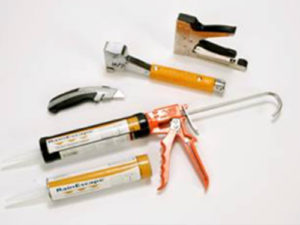 The tools needed to DIY your under-deck drainage system are probably items you already have handy:
√ Scissors or utility knife
√ Staple gun and regular staples
√ Caulk gun
It’s also helpful to have a midspan nail on the joists’ underside to keep them straight.
Step-by-Step Guide to the Setup
Installing your watertight gutter system requires just four steps. The highlights are below:
Step 1. Install the Trex RainEscape downspout.
Cut downspouts along one 12″ or 16″ side on score mark, based on joist spacing. Install all downspouts along one rim joist and/or ledger board; cut out the side toward the open deck bay. The downspout should extend 1″ into the gutter: cut or extend as necessary.
Step 2. Install the Trex RainEscape trough.
This step is the most involved. When working with the Trex RainEscape trough material, ensure that the smooth/shiny side always faces up. Do not seam or overlap the troughs to extend their length.
Get complete instructions and watch a video to ensure a quality installation.
Step 3. Follow Step 2 for the remaining joists.
Step 4. Tape all seams. Make sure the tape completely covers all seams and anywhere a screw will penetrate the Trex RainEscape system.
To estimate the cost of your under-deck drainage system, check out this materials estimator.
Dos and Don’ts of Installation
There are also some quick dos and don’ts to keep in mind. The main idea is that you’re creating a waterproof system, so you’ll have to take precautions not to puncture the system in a way that would create a leak.
Do
- Make all joists straight and square.
- Add outlets to gutter every 12′ – 14′.
- Cover all joists and blocking with trough material, then tape.
- Cover the Trex RainEscape system with deck boards.
- Ensure the troughs and downspouts are dry and clear of debris before applying the tape.
Don’t
- Do not staple Trex RainEscape products anywhere other than into or over floor joists, ledger, rim joists, or headers.
- Do not use spiked hidden fasteners or any fastener without a flat base to provide pressure to butyl tape. Call a Trex RainEscape Specialist at 1-877-348-1385 for recommendations.
- Do not overdrive double-thread screws.
- Do not stand anywhere other than the top of the floor joists, ledger, rim joists, or headers. The Trex RainEscape system cannot support body weight.
- Do not use nails to attach the deck boards above the Trex RainEscape system. For non-standard deck sizes or special features, please reference the installation guide or contact a Trex RainEscape Specialist.
Finishing Touches
 With drainage taken care of, you can finish your under-deck space with a ceiling, lighting, and much more. A ceiling under a deck is often called a soffit made from a variety of materials. Lighting comes in a variety of options too. For example, you might string temporary lights, install a ceiling fan, or create a beautiful permanent solution with Trex® RainEscape® Soffit Light.
Create a new favorite outdoor living space — protected from the elements. Get started on your under-deck oasis by making the most of your two-story deck!