How to Master Deck Framing: Techniques for a Secure Structure
By Dave KileI’ve built countless decks over the years, and I can tell you that a well-constructed frame is often the difference between a deck that lasts for decades and one that’s shaky, unreliable, and potentially headed for failure.
Whether you’re tackling your first deck build or refining your technique, understanding the importance of framing will help you to ensure the safety, stability, and durability of your outdoor retreat. In this guide, I’ll cover everything from load calculations and material selection to step-by-step framing assembly so you can build a strong support for your new deck providing a durable structure that remains strong season after season.
Now, let’s get into the details of deck framing and how to build a solid, long-lasting substructure!
Introduction to Deck Framing
 A deck’s frame provides the essential structure that supports the decking boards, railings, and everything placed on top. Built correctly, it evenly distributes weight to maintain stability and prevent shifting over time.
Most deck frames are constructed using pressure-treated lumber, which resists moisture and decay for long-term durability. As a deck pro, I can tell you that solid framing is literally the foundation of a safe, long-lasting deck. If the frame isn’t built correctly, the entire deck can sag, shift, or even fail under pressure.
At its core, deck framing consists of several key components that work together to distribute weight, provide stability, and keep everything properly aligned.
- For attached decks, the ledger board secures the deck to your home, providing stability on that side, while beams and posts support the opposite end.
- For free-standing decks, posts and beams support the entire structure.
- Beams transfer the load from the joists to the posts, which in turn transfer the load to the footings, keeping the deck stable.
- Joists distribute weight across the frame, running perpendicular to the beams and supporting the decking boards.
- Rim joists define the perimeter of the deck frame, securing the ends of the joists and maintaining structural shape.
- Blocking provides additional lateral stability and prevents joist twisting over time.
With these framing basics in mind, you’re ready to calculate your framing needs to ensure your deck is both durable and well-supported.
Calculate Deck Framing Needs
Before you start constructing your deck frame, you’ll need to determine your deck size, layout, and material requirements for a deck that is structurally sound and meets your building code requirements.
Here, I’ll guide you through the key considerations of deck design, load calculations, and material selection to create a strong and stable frame.
Assess Your Deck Design and Size
Start by assessing your available space and envisioning your deck layout. Think about how the deck will integrate with your home’s existing architecture and its proximity to landscaping elements. Take into account access points, stairs, and your deck’s purpose—whether for entertaining, dining, relaxation, or a combination of these—and what that means for its layout. Consider whether you want multi-level sections or built-in features such as benches or planters that may require additional framing considerations or transitions between levels or for load-bearing support.
Pro Tip: You can sketch out your design to scale on graph paper, but I like using an online deck designer that supports easy dimension adjustments and instant material estimates. Don’t worry, though: If you like the pencil-and-paper approach, I’ll share the formulas you’ll need.
Whatever deck layout you choose, the framing must be structured to handle the expected weight and layout to provide long-term stability, which is why understanding deck loads is critical.
Understand Loads
Your deck framing needs to handle two types of loads:
- Live loads include furniture, people, and anything else placed on the deck.
- Dead loads refer to the weight of the decking, joists, beams, and other permanent structural components, like railings, built-in seating, stairs, or pergolas.
Local building codes typically require decks to support at least 50 pounds per square foot (psf)—which includes both live and dead loads. However, this requirement may be higher in areas with heavy snow loads or for decks supporting additional weight.
Point Loads
Not all weight is distributed evenly. Point loads occur in areas where weight is concentrated, and they require special engineering considerations—beyond consulting span tables. Check your local building codes for specific point load requirements, such as footings under hot tubs or extra blocking for stair landings.
Apply Load Ratings
Your deck’s psf load rating—set by local building codes—determines how much weight your deck must support per square foot. This rating affects joist size, spacing, beam spans, and post placement to ensure the frame can safely carry the load. Joist and beam span tables specify the maximum allowable spans based on lumber size and load capacity.
- Posts & Footings: A deck with higher loads may require 6×6 posts instead of 4x4s and larger or deeper footings to distribute weight evenly and prevent settling.
- Beams: The higher the psf load, the shorter the allowable beam spans or the more mid-span posts are needed to reduce deflection.
- Joists: The higher the psf load, the larger the joists or the closer the spacing must be.
For example, a deck supporting a standard 50 psf load may allow 2×8 joists at 16 inches on center (O.C.), but a hot tub deck rated for 100 psf may require 2×10 joists spaced 12 inches O.C.
Pro Tip: Online span calculators can determine joist and beam spans based on your deck’s psf rating and lumber. You can also find span tables in your local building codes or ask your lumber supplier.
Your deck’s total load isn’t used to directly calculate framing, but it can help you understand how much weight your deck can handle.
Total Load Formula:
Deck Surface Area (sq. ft.) × 50 psf (or higher, as required by local codes)
Example:
For a 12′ × 16′ deck at 50 psf,
192 sq. ft. × 50 psf = 9,600 lbs.
The 9,600 lb. load is spread across the entire frame.
Calculate Material Requirements
Deck design software or online span calculators can automatically generate estimates for your framing from your inputs. Automated tools are convenient, but I find knowing how these calculations work is valuable for double-checking their results and making adjustments.
In this section, I’ll walk you through the key calculations so you can verify results or—if you like old school methods—manually determine the framing material requirements yourself.
Here’s what you’ll need:
- Your deck’s psf load rating (from your local building codes)
- Joist and beam span tables (to determine allowable spans)
- Your deck dimensions (length, width, and framing layout, which influence joist spacing, beam placement, and post locations)
Posts
 Posts transfer the load from the beams to the ground. A standard 6×6 post can typically support a double 2×10 beam with post spacing up to 9’8”, depending on local codes, soil conditions, and total load requirements.
CALCULATION
Post Count: Verify post spacing by using a beam span table (see Beams below) to find the maximum allowable distance between posts, then divide your total beam length by the spacing to calculate the number of posts required.
If your deck carries more weight, you may need:
- Additional posts per beam to reduce spacing.
- Larger footings to spread the load.
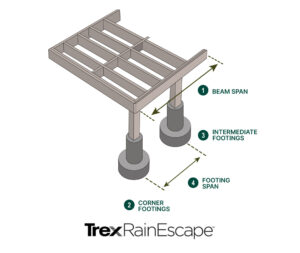
Beams
 Beams distribute weight from the joists to the support posts and are generally built by doubling two boards for added strength and stability. Beam length depends on the deck width and placement of support posts, and the distance between beams depends on joist spans and total load.
Beam Span Table Example (Partial)
Example spans for double beams made from pressure-treated Southern Pine under standard residential loads (50 psf & 60 psf) with 8′ post spacing. Always verify spans with local codes and lumber supplier guidelines.
| Beam Size (Double) | Maximum Span (50 psf, 8′ Post Spacing) | Maximum Span (60 psf, 8′ Post Spacing) |
| (2) 2×8 | 7′ 7″ | 7′ 0″ |
| (2) 2×10 | 9′ 8″ | 9′ 0″ |
| (2) 2×12 | 11′ 10″ | 11′ 0″ |
If your deck requires longer spans, consider:
- Adding mid-span support posts to shorten beam spans.
- Upgrading to larger beams (e.g., from two 2x10s to two 2x12s).
Joists
 Joists support the deck surface, running perpendicular to the beams and spanning between them. Their size, spacing, and span depend on your deck dimensions and load requirements.
Use your joist span table to find the maximum allowable span for different joist sizes based on standard spacing (12″, 16″, or 24″ on center (O.C.)) and the required psf rating.
Joist Span Table Example (Partial)
Example spans for pressure-treated Southern Pine under standard residential loads (50 psf & 60 psf). Always verify spans with local codes and lumber supplier guidelines.
| Joist Size | Maximum Span (16″ O.C.) – 50 psf | Maximum Span (12″ O.C.) – 50 psf | Maximum Span (16″ O.C.) – 60 psf | Maximum Span (12″ O.C.) – 60 psf |
| 2×6 | 9′ 9″ | 10′ 11″ | 9′ 0″ | 10′ 0″ |
| 2×8 | 12′ 10″ | 14′ 2″ | 11′ 10″ | 13′ 4″ |
| 2×10 | 16′ 0″ | 18′ 0″ | 14′ 6″ | 16′ 10″ |
| 2×12 | 18′ 6″ | 21′ 0″ | 17′ 0″ | 19′ 6″ |
CALCULATIONS
Joist Length: The joists span from ledger board to beam or from beam to beam in freestanding decks. Measure these distances and cross-reference with your span table to ensure proper support.
Joist Count Formula:
Total Joists = (Deck Depth in inches ÷ Joist Spacing in inches) + 1
Example:
For a 12′ (144″) deck with 16″ O.C. spacing,
(144 ÷ 16) + 1 = 10 joists
Pro Tip: The “+1” accounts for both the starting and ending joists.
If your deck supports extra weight, such as a hot tub or outdoor kitchen, consider:
- Upgrading to thicker joists (e.g., from 2x8s to 2x10s) for added strength.
- Reducing joist spacing (e.g., from 16” O.C. to 12” O.C.) to prevent sagging.
- Adding mid-span blocking to improve load distribution and reduce deflection.
Rim Joists
 Rim joists define the overall framing structure, either aligning with your decking edges or inset, depending on your design. They are typically the same size as the deck joists—commonly 2×8, 2×10, or 2×12 pressure-treated lumber—to provide consistent structural support. Use a joist span table to determine the appropriate joist size for your deck, and match the rim joists accordingly.
If your design includes picture framing, overhangs, or cantilevered sections, the framing will be inset from the deck edge. In these cases, the framing perimeter is not identical to the finished deck perimeter, so be sure to account for the inset as well any local building codes requirements.
CALCULATION
Rim Joist Length: Measure the total framing perimeter to calculate the required linear footage of rim joists. For increased strength and stability, I recommend using double rim joists whenever possible—if you do, multiply the perimeter length by 2.
Hardware, Fasteners & Tape
 In addition to framing lumber, you’ll need some additional items to secure and protect your deck structure. The exact quantities depend on deck size, joist spacing, and connection points, but here are some general estimates:
- Post Bases & Anchors – 1 per post to secure posts to footings and prevent movement.
- Beam-to-Post Connectors – 1 per post-beam connection to ensure beams are properly attached.
- Joist Hangers – 2 per joist (one for each end where joists connect to beams or ledger).
- Structural Screws & Bolts – Varies based on ledger length, beam connections, and local code; typically every 16″ along the ledger and beam connections.
- Flashing & Joist Tape – Seal the ledger board, joists, beams, and blocking to prevent moisture infiltration and prolong the life of your framing.
Example Deck Framing Plan
Let’s say you’re building a 12′ × 16′ deck with a hot tub.
Note: Always check local building codes, psf load ratings, and point load requirements before finalizing your framing plan. This example is for a hot tub deck rated at 100 psf, which is standard for supporting heavy loads.
Load Consideration:
Estimated total load: (192 sq. ft. × 100 psf) + 2,500 lbs. hot tub = 21,700 lbs.
This weight must be distributed across joists, beams, and posts according to span tables and local codes.
Framing Adjustments & Material Lengths:
Footings: Increase footing diameter to support heavier load.
- (6) footings; check local code for specific size
Posts: Reduce beam spans to 6’–8′ max by adding extra 6×6 posts for additional load support.
- (6) 6×6 posts
Beams: Use (2) 2x12s instead of (2) 2x10s to increased support and reduced deflection.
- (2) 16′ boards spanning the deck width
Joists: Upgrade from 2x8s to 2x10s, spaced 12″ O.C. for added strength.
- (10) 2x10s, each spanning 12′
Rim Joists: Use 2x10s to frame the perimeter.
- (2) 16′ boards for the long sides
- (2) 12′ boards for the short sides
Hardware, Fasteners & Tape:
- Post Bases & Anchors – (6) total, one per post
- Beam-to-Post Connectors – (6) total, one per post-beam connection
- Joist Hangers – (20) total, two per joist
- Structural Screws & Bolts – Varies based on ledger length and beam connections; typically every 16” along the ledger and beam connections
- Flashing Tape – To cover the ledger board, all joists, beams, and blocking
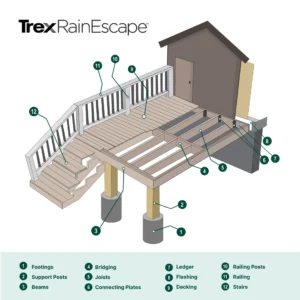
Deck Framing Parts and Tools
A well-built deck relies on a strong frame, made up of structural components that work together to distribute weight and provide long-term stability. I’ve already talked about some of these elements in detail, but here’s a quick reference to the key parts of any deck frame.
For a comprehensive look at deck components, check out the parts of a deck here.
Essential Deck Framing Components
Every deck frame includes several fundamental components that ensure stability and strength:
- Posts: Vertical supports that transfer the deck’s load from the beams to the footings.
- Ledger Board: Secures attached deck to your home or other structure, providing foundational support.
- Rim Joists: Form the outer edges of the deck framing, securing the ends of the joists and maintaining the deck’s shape and stability.
- Beams: Larger supports that carry the weight of the joists.
- Joists: Horizontal supports that span the deck and hold up the decking surface.
- Blocking: Short pieces of wood placed between joists for additional lateral support and to prevent twisting.
Each of these components plays a crucial role in ensuring a secure and long-lasting deck. Proper installation and material selection will help prevent sagging, warping, or premature deck failure.
Tools Needed for Deck Framing
These are the tools you’ll want on hand for cutting, aligning, and securing your framing materials:
- Circular saw
- Power drill
- Level
- Tape measure
- Post hole digger
- Hammer
- Speed square
- Level or laser level
- Framing nailer (optional)
- Chalk line
- Safety gear, including goggles and gloves
Assembling the Deck Framing Components
A strong deck frame starts with properly installed footings, followed by posts, beams, joists, and rim joists. The placement and number of these components are determined by your deck’s size, load rating, and local building codes, as covered in the Calculate Material Requirements section of this guide.
1. Set and Level the Deck Footings
 Footings serve as the foundation, anchoring the deck to the ground and providing critical support for the framing. Their size, depth, and placement depend on load capacity, frost depth, and soil conditions.
For guidance on securing a solid foundation, read How to Install Deck Footings.
Start by digging your footings according to local building codes. Pour concrete into the holes and set post anchors while the concrete is still wet. Use a level to ensure the anchors are perfectly aligned. If you’re building on uneven ground, adjustable post bases simplify leveling.
Pro Tip: I recommend wetting the ground slightly before digging to make the process easier.
For extra stability, especially in areas with freeze-thaw cycles, use frost-proof footings or extend concrete footings below the frost line to help prevent shifting over time.
2. Secure the Ledger Board
 For an attached deck, secure the ledger board to your home’s exterior using lag screws or bolts. This creates a strong structural connection between the deck and the house. Always protect the ledger board with flashing to prevent water infiltration and rot.
3. Install the Beams and Posts
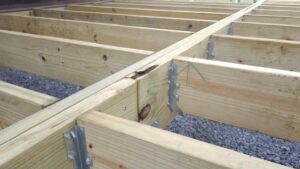 Position your posts in the post anchors and secure them with bolts or structural screws. Trim them to the required height, ensuring the tops are level.
Next, place your beams on top of the posts and secure them using post-to-beam connectors or metal brackets.
Pro Tip: Clamp beams in place temporarily while securing them for easier alignment.
4. Lay Out and Install the Joists
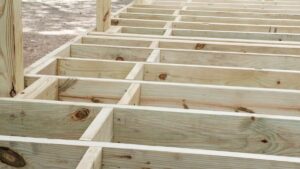 Attach joist hangers to the ledger board, then install the joists across the beams. Follow local building codes for joist spacing—typically 12” or 16” on center (O.C.) for composite decking, and up to 24” O.C. for wood decking, depending on the joist size.
For extra stability, use hurricane ties or joist hangers with structural screws to secure the joists to the beams.
Pro Tip: Use a chalk line to mark joist positions for consistent spacing before installation.
5. Install the Rim Joists
 Once joists are in place, install rim joists around the perimeter of the deck to complete the framing. Secure them to the joist ends using carriage bolts, screws, or structural connectors.
For decks with heavy loads or wider spans, consider doubling the rim joists for additional strength and structural integrity.
6. Double-Check Alignment
Before securing everything, check that your frame is square by measuring diagonally from corner to corner. The measurements should match exactly—if not, adjust before final fastening.
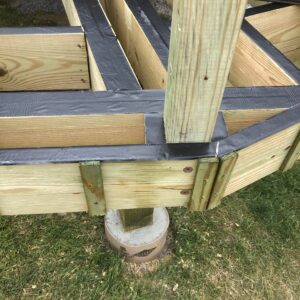
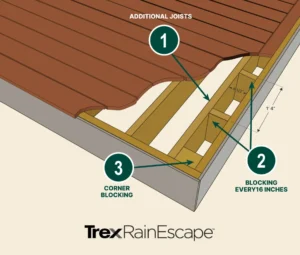
7. Install an Under-Deck Drainage System
 This step is optional, but if you plan to create a dry, usable space below your new deck, now is the time to install an under-deck drainage system. Over-the-joist systems, such as Trex RainEscape, are installed before the decking is laid. They divert water under a deck by channeling it away into a gutter system, preventing it from dripping through to the area below. Because the system is applied above the joists, it also helps keep your framing dry.
By adding a drainage system at this stage, you’ll protect the substructure from moisture damage, waterproof your deck, and maximize the usability of the space below.
Picture Framing Techniques
Despite its name, picture framing isn’t about the deck frame. Instead, it’s a finishing technique that enhances the perimeter of the decking surface by creating a defined border around the field boards.
What is Picture Framing?
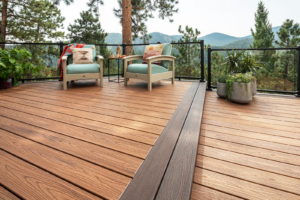 Picture framing is a layout technique where a border of deck boards runs around the deck perimeter, creating a framed effect. The outermost boards run parallel to the deck edges, hiding cut decking ends and surrounding the field boards inside. The border corners typically meet at a 45-degree angle for a seamless mitered joint.
I use this popular border design to enhance visual appeal while also protecting cut decking ends from exposure. Picture framing is a simple way to elevate the look of your deck while reinforcing its structure.
How to Frame the Perimeter
 1. Measure and Plan
Start by planning the width of your picture frame border. A standard picture frame detail typically consists of a single decking board width, with the framing inset to accommodate this border while allowing for a slight overhang. The amount of inset depends on the decking board width and the desired overhang, usually 1″ to 1.5″ beyond the framing.
2. Install the Rim Joists
Lay and secure the rim joists that form the perimeter of the deck frame. Ensure they are properly aligned using a level and tape measure. The rim joists should be positioned to create a stable structure for the picture framing detail while accounting for the necessary overhang.
3. Add Blocking for Picture Frame Support
Install blocking or additional framing as needed to support the picture frame boards, especially at corners and transitions. Blocking provides solid fastening points where picture frame boards don’t align with joists, reinforces the mitered cuts to prevent separation over time, and helps maintain structural integrity by keeping the deck frame rigid.
4. Attach the Picture Frame Boards
Cut the decking boards to size, accounting for the 45-degree mitered corners, and secure them using hidden fasteners or color-matched deck screws at both ends of the joint to reduce movement.
For your mitered corners, spacing is key to preventing buckling over time:
- Composite decking: Generally, you’ll want to keep the joints tight at installation. Some manufacturers recommend using hidden fasteners or biscuits to reinforce corners without visible gaps. If expansion is a concern in your climate, leave a 1/32″ gap at the miter.
- Wood decking: Wood expands and contracts more than composite, so it’s best to leave a small gap (1/32″ to 1/16″) at mitered joints to prevent buckling. I like to seal cut ends to reduce moisture absorption.
Common Picture Framing Mistakes to Avoid
- Lack of Proper Support: Picture frame boards need additional blocking or framing to prevent sagging over time. Without adequate reinforcement, the boards may flex or become unstable.
- Incorrect Measurements: Miscalculating the inset distance or board lengths can lead to uneven gaps, misaligned joints, or inconsistent overhangs.
- Improper Mitered Cuts: Failing to cut precise 45-degree angles at corners can result in gaps or uneven joints that diminish the frame’s appearance.
- Skipping Expansion Gaps: Decking expands and contracts with temperature changes. Not allowing for proper spacing— both between the picture frame and field decking, and at mitered corners—can cause buckling or warping over time.
- Fastening Mistakes: Using nails instead of screws, non-corrosion-resistant fasteners, or failing to secure both ends of mitered joints can lead to shifting, loosening, or rust stains over time.
Conclusion
Congratulations—you’re well on your way to becoming a Deck Framing Master! A strong, well-built frame is the foundation of every great deck, and by applying these techniques, you’re ensuring your structure is safe, stable, and built to last. Whether you’re framing a simple platform or a multi-level outdoor retreat, precision and best practices make all the difference.
From calculating loads to securing beams and joists, every detail plays a role in long-term durability. Before moving on to decking installation, always take time to double-check your framing work—make sure everything is level, secure, and properly reinforced. With a rock-solid foundation in place, your deck is ready for the next phase, and you’re one step closer to enjoying your finished outdoor retreat!
Sources
American Wood Council. (2022). Prescriptive residential wood deck construction guide (DCA 6). American Wood Council. https://awc.org/wp-content/uploads/2022/02/AWC-DCA62012-DeckGuide-1405.pdf
Decks.com. (2023). How to build a deck: Step-by-step guide. Trex. https://www.decks.com/how-to/building
Fine Homebuilding. (2022). Building strong and durable decks: Framing, footings, and fastening systems. Fine Homebuilding. https://www.finehomebuilding.com/project-guides/decks
Family Handyman. (2023). Deck building: Planning, framing, and finishing. Family Handyman. https://www.familyhandyman.com/project/how-to-build-a-deck/
Fine Homebuilding. (2021). How to Install a Picture-Frame Deck Border. Fine Homebuilding. https://www.finehomebuilding.com/project-guides/decks/installing-a-picture-frame-border
International Code Council. (2021). International residential code for one- and two-family dwellings (IRC). International Code Council. https://codes.iccsafe.org/
This Old House. (2024). How to Build a Simple Deck. This Old House. https://www.thisoldhouse.com/decking/21016509/how-to-build-a-deck
Trex Company, Inc. (2023). Trex decking installation guide. Trex. https://www.trex.com/build-your-deck/installation-guide/