Waterproofing A Deck Over Living Space
By Dave KileAny outdoor space you have will be exposed to temperamental weather – guaranteed. Therefore, it’s essential to add protection to your outdoor furniture and deck; think gutters, drains, and waterproofing your deck. Waterproofing a deck over an outdoor living space abides by this rule, as it’s detrimental to stopping runoff water from causing any damage. However, there are many things to consider before diving into a waterproofing project, such as the best water-resistant materials and best practices for installation. Keep reading to learn more about TREX’s tips and best practices for choosing the proper materials and procedures for waterproofing.
 Choosing The Best Deck Waterproofing Materials
As a buyer beware, we want first to discern the difference between waterproof and water-resistant terminology since most manufacturers label their products falsely as waterproof. Waterproof materials are materials that are completely impenetrable to water. Water-resistant, however, “sheds” water off itself but still has the capacity to absorb it.
It’s important to keep this in mind when choosing the best waterproofing material. Some of our top choices are:
- PVC Decking: Made entirely of plastic, which is entirely waterproof, this is an excellent choice to prevent water damage. You can opt for capped boards to add extra longevity to your deck.
- Aluminum Decking: One of the more expensive options, aluminum decking is a popular option for its durability. This material is fully waterproof but poses problems with installation due to difficulty cutting and installing the material.
- Composite Decking: A popular choice, composite decking is a blend of two materials. Most commonly, it blends wood with plastic and comes in a variety of designs. However, this decking material is water-resistant, so most are installed with capped boards for extra protection.
- Wooden Decking: One of the most standard and popular decking materials, wooden decking has tons of design choices at an attractive price point. However, wood is water-resistant at best and will need extra treatments and sealants to last.
Deck Membranes and Downspouts
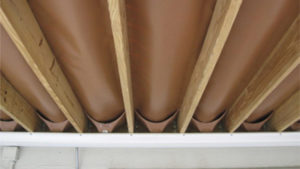
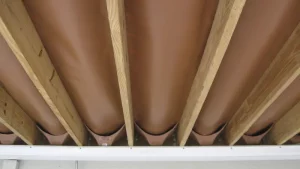
Adding a deck membrane and downspout is a great “set and forget” option for waterproofing your deck roof. These come in different materials, such as vinyl, EDPM (ethylene propylene diene terpolymer), asphalt, and more. Essentially, the deck membrane is placed between your deck and the substructure in joist spaces below your decking. With this in place, it can direct the water towards downspouts, essentially mini-gutters, that will catch any water and send it away from the space below. We recommend using an EPDM membrane for any flat or low-slope roofs, as it’s a rubber membrane that is entirely waterproof and can hold water off far better than other membrane materials.
Overall, this method drastically reduces the ongoing maintenance needed, like yearly touch-ups of waterproofing sealants, helping your deck’s waterproof ability last throughout the seasons and weather.
Under-Deck Ceiling Systems
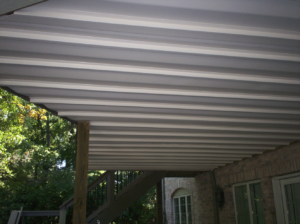
Homeowners typically go for aluminum or vinyl under-deck ceiling systems, as they are both affordable and easy to install. Check out the pros, cons, and costs of under-deck ceiling systems here.
Waterproofing Deck Flanges
Another type of installation is installing waterproof deck flanges. Instead of an entire underneath ceiling system, rubber flanges fill the cracks between your deck panels. It acts as a first defense against rain and snow and provides an impromptu drainage system for your under-deck area. However, installing flanges may require altering the deck, which could impact the deck material, opening it up for water damage in the future.
Waterproof Liquid Deck Coatings
If you are looking for a simple solution, go with surface-level liquid deck coatings. These are easy to accomplish as a DIY project and still give your deck a waterproof coating. Opt for polymer-enhanced coatings to help bounce water off your deck. It’s an easy and quick solution for waterproofing your deck, but it also requires maintenance and upkeep as it lacks longevity.
Steps to Waterproof the Deck Over Living Space
Read below our best practices and recommended steps to waterproof the deck over your living space.
Step 1: Gather your materials and plan them out
Select your deck membrane material from vinyl, plastic, or EPDM membrane. Then, hire a professional to do the installation on your behalf. Professionals are crucial since they have the experience to safely waterproof the under-deck roof.
If you selected an EPDM membrane, make sure to look for someone with experience in single-ply membrane roofing. If you chose vinyl, consider installing Tufdek vinyl membrane, a walkable and slip-resistant membrane that is easy to install and visually appealing. Either way, make sure your contractor ensures the membrane will abide by your building’s code.
Step 2: Substrate Preparation
You must prep the deck of your surface before getting into the actual installation. Prepping the deck can look like removing damaged plywood or installing brand-new wood for an even structure. Either way, your contractors will remove dust particles and properly sand the substrate beforehand. From there, the substrate’s cracks and uneven areas will be covered with plaster to ensure it is even and secure. Finally, the plaster will need to dry and be sanded down once more before moving to the next step.
Step 3: Install Metal Flashings
Using metal flashings, as it’s the most common and best-used material for this purpose, they will be installed and sealed along the perimeters of your deck’s edges. First, sand the edges to make a “slope” or recess water area for the metal flashings to be installed on. From there, any intersection from the wall to the deck will be sealed with the flashings to create a sturdy foundation and barrier, acting as a first defense against runoff water.
Step 4: Apply the Deck Membrane
Finally, it is time to apply the deck membrane. After properly measuring and laying out, the correct adhesive for your selected membrane will be applied all over the substrate. The contractors will have to consider weather temperatures and humidity as they can affect the adhesive’s capability to bond to the membrane. While still wet, the membrane will be laid out and sealed down to the adhesive, ensuring no air bubbles are present. You can be sure that no water will soak through the membrane any time soon, as a final step in applying the deck membrane is welding the membrane to any walls or beams on your deck.
Key Considerations for A Leak-proof Deck
At one point or another, your deck will begin to leak. It’s inevitable, especially when heavy downpours hit unexpectedly. However, there are some key considerations, almost best practices, to keep in mind when waterproofing your under-deck area. Below, we explore these key considerations, so you are adequately prepared when you begin waterproofing.
Deck Surface to Slope Away at ¼ Inch Per Foot
Proper Flashing Using Deck-Compatible Material
Flashing has taken the installation world by storm, popularized by its easy waterproof ability. While not commonly used for all-over deck waterproofing, it’s great for spot-treating small areas and windows. Flashing can be installed in various ways, like peel and stick tape, but the asphalt membrane makes patchwork a breeze.
However, it’s important to note that the flashing adhesive will not properly work with wood, OSB, and plastic sheathing. If you are flashing with one of these deck materials, make sure to prime and wait until warmer weather for the adhesive to bond properly. While still not recommended, it’s a good fix-up solution until you get the chance to waterproof your deck properly.
Proper Drainage Using Gutters
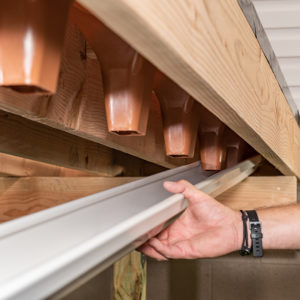
Attach the gutter on the underside of the deck frame.
To add extra insurance against water damage, install gutters onto your under-deck roof so rain can run away naturally from the under-deck area. Placing the gutters at the angles of your deck and/or slopes will direct the water away from the under-deck space. However, gutters need to be up-kept and require year-round maintenance. If ongoing maintenance is not feasible or plausible, consider adding gutter guards to prevent debris from clogging your gutters and potentially damaging them.
Frequent Questions About Waterproofing a Deck Over Living Space
It’s normal to question your choices or doubt the ones you’ve made are the right ones. Installing and designing your under-deck living space are important questions to ask when waterproofing your deck. Some good questions to ask throughout the installation process are:
- Is it possible to waterproof an existing deck?
- What is the cost of waterproofing a deck?
- How long does it take to waterproof a deck?
Now that you have all the best waterproofing materials, steps, and key considerations, let’s explore the answers to these questions.
Is it Possible to Waterproof an Existing Deck?
Despite the best practice of waterproofing during the deck build, you can still waterproof an existing deck. The installation will take longer and may include more steps, but waterproofing is always possible and needed for existing decks. The best route is typically to apply a waterproof sealant before inserting any waterproofing flanges or installing an under-deck ceiling system.
What is the Cost to Waterproof a Deck?
All the costs will vary depending on the size of your deck, the treatment, and the labor costs. On average, waterproofing a deck with sealants will cost between $500-$1,200, with about 50-75% of that cost factoring into the labor required to get the job done.
Check out our article here that details the overall costs you can expect when waterproofing your deck.
How Long Does it Take to Waterproof a Deck?
Treating your deck with waterproof sealants will take roughly 2-3 days for the deck to properly take the seal and bond its elements within the deck. However, newer decks tend to hold moisture really well and can be waterproofed more quickly than older decks. Older decks need to be waterproofed in dry-hot temperatures where the wood will open up and properly take to the waterproof sealants.


